> ## Documentation Index
> Fetch the complete documentation index at: https://docs.stably.ai/llms.txt
> Use this file to discover all available pages before exploring further.
# Bring Your Own Repo
> Connect your existing GitHub or GitLab repository to Stably for test case management and the web editor.
**This integration is only needed if you want to use Stably's [web editor](/stably2/web-quickstart).** If you just want to run your existing tests in CI/CD (GitHub Actions, GitLab CI, etc.), you don't need this — see our [CI/CD guide](/run-tests/cli-in-ci) instead.
Connect your existing repository so Stably can sync test cases between your codebase and the [web editor](/stably2/web-quickstart). This lets you create, edit, and manage tests from both the Stably dashboard and your local development environment.
## Why bring your own repo?
* **Edit anywhere, stay in sync** — Make changes in your IDE, Stably's [web editor](/stably2/web-quickstart), or CLI—everything syncs to the same repository automatically
* **Existing tests & rules** — Already have Playwright tests, custom configurations, or team conventions? Stably works with what you have
**Just need CI/CD?** You can run Stably tests in any CI/CD pipeline without connecting a repository here. See the [CI/CD integration guide](/run-tests/cli-in-ci) for GitHub Actions, GitLab CI, CircleCI, Jenkins, and more.
## Supported providers
GitHub integration uses a GitHub App for authentication. This provides bot-based commits by default with optional personal attribution.
This setup connects your repo to Stably's [web editor](/stably2/web-quickstart) and test case management. To run tests in GitHub Actions instead, see the [GitHub Actions CI guide](/run-tests/github-actions).
### Connect a GitHub repository
Click **Install GitHub App** to authorize Stably to access your repositories.
Select your repository and configure the connection settings:
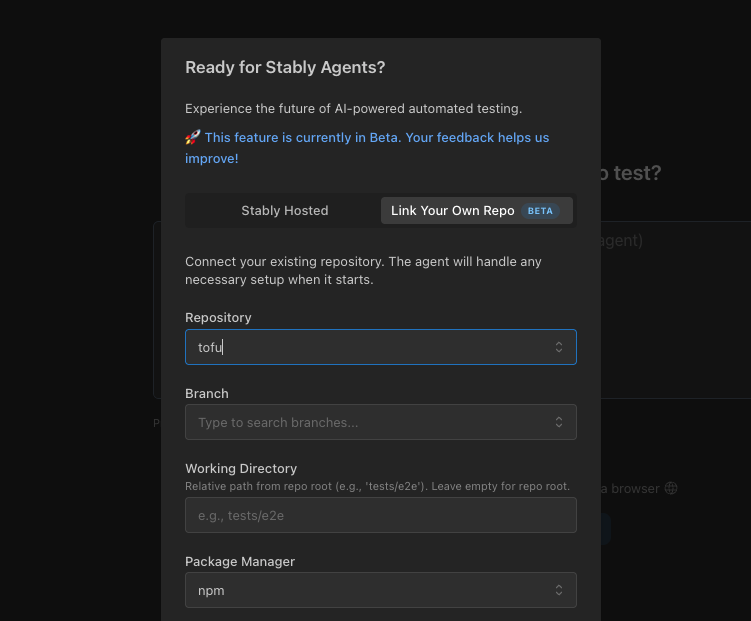
* **Repository** — Select the GitHub repository to connect
* **Branch** — Choose the branch to sync with (e.g., `main`, `develop`)
* **Working Directory** — Relative path from repo root where tests live (e.g., `tests/e2e`). Leave empty for repo root. Stably auto-detects existing `playwright.config` files.
* **Package Manager** — Select your package manager: `npm`, `pnpm`, `yarn`, or `bun`
* **Publish Behavior** — Choose how changes are published:
* **Create Pull Request** — Creates a PR for review before merging
* **Push to main branch directly** — Pushes changes directly to the main branch
Create tests with the web editor or CLI—they all sync to your repository automatically.
### PR authorship (GitHub)
By default, PRs created by Stably show the Stably bot as the author. You can connect your personal GitHub account so PRs show you as the author instead.
To enable: go to **Settings > Git** and click **Connect GitHub** in the PR Authorship section.
GitLab integration uses OAuth to connect your GitLab account. Merge requests are attributed to your account.
This setup connects your repo to Stably's [web editor](/stably2/web-quickstart) and test case management. To run tests in GitLab CI instead, see the [GitLab CI guide](/run-tests/run-tests-on-gitlab) or the general [CI/CD guide](/run-tests/cli-in-ci).
### Connect a GitLab repository
Click **Authorize GitLab** to connect Stably to your GitLab account.
Select your repository and configure the connection settings:
* **Repository** — Select the GitLab repository to connect
* **Branch** — Choose the branch to sync with (e.g., `main`, `develop`)
* **Working Directory** — Relative path from repo root where tests live (e.g., `tests/e2e`). Leave empty for repo root. Stably auto-detects existing `playwright.config` files.
* **Package Manager** — Select your package manager: `npm`, `pnpm`, `yarn`, or `bun`
* **Publish Behavior** — Choose how changes are published:
* **Create Merge Request** — Creates an MR for review before merging
* **Push to main branch directly** — Pushes changes directly to the main branch
Create tests with the web editor or CLI—they all sync to your repository automatically.
## Migrating an existing Stably project
If you already have a Stably project using the managed repository and want to switch to your own:
Make sure your project is using **Agent 2.0**. You can check this in your project settings.
Go to **Settings > Git** to export your existing tests. This creates files you can import into your own repository.
Follow the GitHub or GitLab setup steps above to connect your repository.
## Troubleshooting
If you see "GitLab authentication failed", your OAuth token may have expired. Re-authorize GitLab in your project settings.
Make sure your GitLab account has write access to the repository you're trying to connect.
## Compatibility
* **Git providers**: GitHub, GitLab
* **Works with any web application** — Supports React, Angular, .NET, and any backend framework (e.g., Python, Rust). Our tests simulate real user behavior, so we're technology agnostic.
## Next steps
Create your first test in the web editor
Generate tests from your terminal
Run tests in your CI/CD pipeline (no repo connection needed)
Run tests with the Stably GitHub Action