> ## Documentation Index
> Fetch the complete documentation index at: https://docs.stably.ai/llms.txt
> Use this file to discover all available pages before exploring further.
# Environments
> Create and manage named environments with variables for different contexts like Production, Staging, and Local Dev.
## Overview
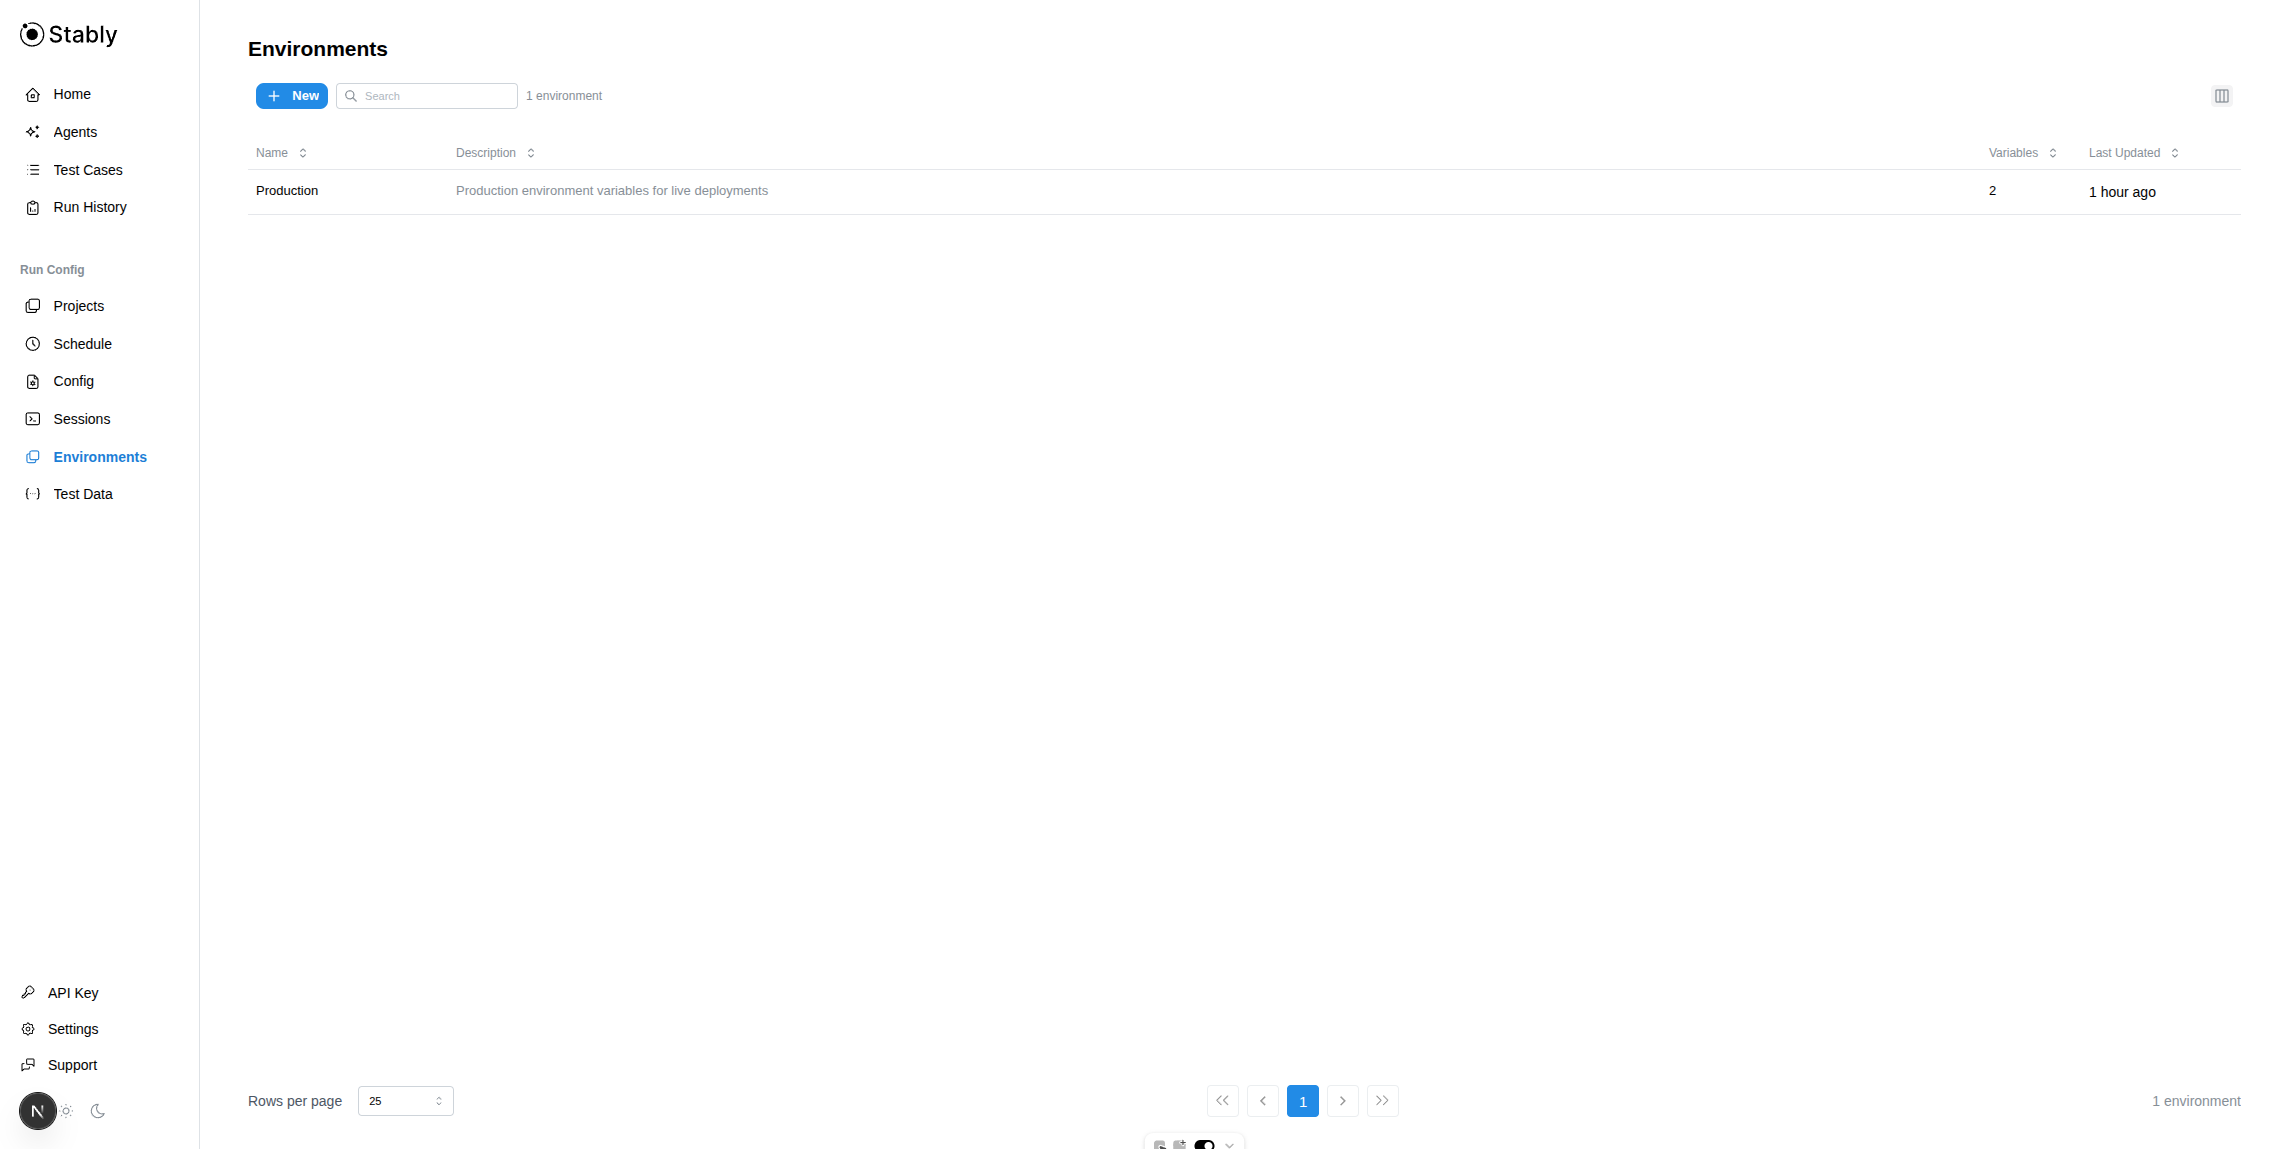
Environments let you organize variables into named groups — such as **Production**, **Staging**, or **Local Dev** — so your tests can use different configurations depending on the context they run in.
Each environment holds a set of key-value variables that your tests can reference at runtime. Variables can be marked as **sensitive** to protect secrets like API keys and passwords.
 ***
## Creating an Environment
Click **Environments** in the sidebar.
Click the **+ New** button in the toolbar.
Provide a **Name** (e.g., `Production`, `Staging`) and an optional **Description** to help your team understand what this environment is for.
***
## Creating an Environment
Click **Environments** in the sidebar.
Click the **+ New** button in the toolbar.
Provide a **Name** (e.g., `Production`, `Staging`) and an optional **Description** to help your team understand what this environment is for.
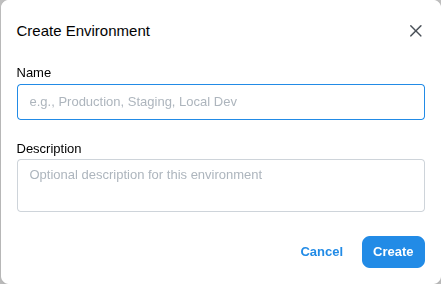 Click **Create**. The new environment appears in the table and opens automatically.
***
## Managing Variables
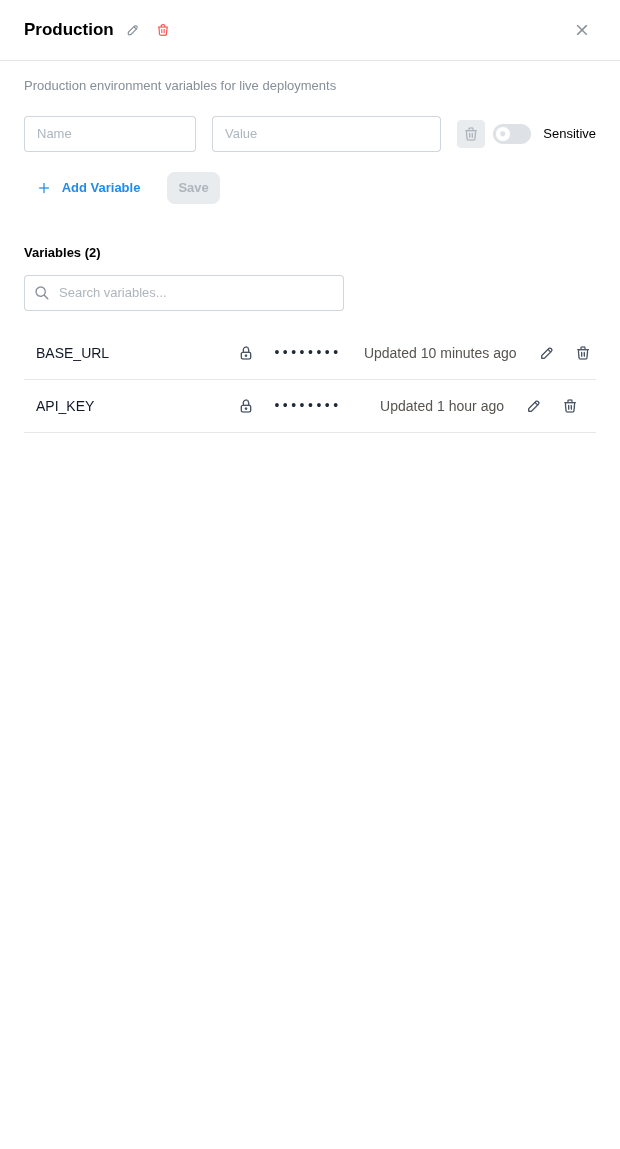
Click any environment row to open its detail drawer, where you can add, edit, search, and delete variables.
Click **Create**. The new environment appears in the table and opens automatically.
***
## Managing Variables
Click any environment row to open its detail drawer, where you can add, edit, search, and delete variables.
 ### Adding Variables
Type a variable **Name** and **Value** in the form at the top of the drawer.
### Adding Variables
Type a variable **Name** and **Value** in the form at the top of the drawer.
 Toggle **Sensitive** if the value contains a secret (API key, password, token). Sensitive values are encrypted and masked in the UI.
Once a variable is marked as sensitive, it **cannot** be changed back. The value will be hidden and only accessible by your tests at runtime.
Click **+ Add Variable** to add multiple variables at once before saving.
Click **Save** to store all new variables.
### Editing Variables
Click the **pencil icon** on any variable row to open inline editing. You can change the name, value, or toggle the sensitive flag (for non-sensitive variables only).
### Deleting Variables
Click the **trash icon** on any variable row. A confirmation dialog will appear before the variable is permanently removed.
***
## Sensitive Variables
Sensitive variables provide an extra layer of protection for secrets:
| Behavior | Detail |
| ----------------------------- | ----------------------------------------------------------------------------------------------------- |
| **Masked in UI** | Displayed as `••••••••` with a lock icon. |
| **Hidden from API** | The `get` endpoint returns `null` for sensitive values. |
| **Irreversible** | Once marked sensitive, a variable cannot be changed back. |
| **Editable value** | You can update the value of a sensitive variable, but you won't see the current value. |
| **Auto-scrubbed from traces** | When using `--env`, sensitive values are automatically redacted from Playwright traces before upload. |
Always mark API keys, passwords, database credentials, and tokens as **Sensitive**.
### Automatic Trace Scrubbing
When you run tests with `stably --env test`, any variable marked **Sensitive** is automatically scrubbed from Playwright traces before they are uploaded to Stably. You do not need to configure `sensitiveValues` in your `playwright.config.ts` — the CLI handles it for you.
This means the simplest way to protect secrets in traces is:
1. Add your secrets as variables on this page and mark them as **Sensitive**.
2. Run tests with `--env`:
```bash theme={null}
stably --env Staging test
```
That's it — sensitive values are redacted automatically.
If you need to scrub additional values that are not stored in a Stably Environment (e.g., locally defined secrets), you can also pass them manually via the `sensitiveValues` option in the reporter config. See [Stably Test Reporter — Sensitive Data Scrubbing](/stably/stably-test-reporter#sensitive-data-scrubbing) for details.
***
## Default Environment
You can set a **default environment** for your project. The default environment is automatically used by scheduled runs and cloud executions when no specific environment is selected.
To set a default, click the **star icon** next to an environment in the list, or use the **Set as Default** option in the environment detail drawer.
***
## Using Environments from the CLI
The `--env` flag lets you load a named environment's variables directly from Stably when running CLI commands. This removes the need to manage local `.env` files — variables are fetched securely from the Stably API at runtime.
```bash theme={null}
# Load variables from your "Staging" environment
stably --env Staging test
# Works with all CLI commands
stably --env Production create "login test"
stably --env "Local Dev"
```
The CLI fetches all variables from the named environment and injects them into `process.env` for your tests. Variables marked as **Sensitive** are automatically scrubbed from Playwright traces — see [Automatic Trace Scrubbing](#automatic-trace-scrubbing) above.
The `--env` flag requires authentication. Set `STABLY_API_KEY` and `STABLY_PROJECT_ID`, or run `stably login` first.
### Variable Precedence
When using the CLI, variables can come from multiple sources. They are resolved in the following order, from **lowest** to **highest** priority:
| Priority | Source | Description |
| ----------- | ---------------- | ------------------------------------------------ |
| 1 (lowest) | `process.env` | System environment variables and shell exports |
| 2 | `--env-file` | Local `.env` files loaded via `--env-file path` |
| 3 | `--env` | Remote environment variables fetched from Stably |
| 4 (highest) | Stably internals | `STABLY_API_KEY`, `STABLY_PROJECT_ID` |
If the same variable name exists in multiple sources, the higher-priority source wins. For example, a `BASE_URL` defined in your `--env Staging` environment will override the same variable from a local `--env-file .env` file.
You can combine `--env` and `--env-file` in the same command. Use `--env-file` for local overrides and `--env` for shared team configuration stored in Stably.
### Loading from a Local `.env` File
You can also load variables from a local file using the `--env-file` flag:
```bash theme={null}
# Load from a specific file
stably --env-file .env.staging test
# Load multiple files (later files override earlier ones)
stably --env-file .env --env-file .env.local test
```
### Downloading as `.env`
Click **Download .env** in the environment detail drawer to export all variables as a `.env` file. Non-sensitive variables include their full values, while sensitive variables appear as empty placeholders.
Sensitive variable values are **not** included in the download. You will need to fill them in manually.
### Bulk Import
Typically, managing test secrets across CI providers means adding each variable individually in GitHub Actions, GitLab CI, Jenkins — and keeping them in sync when credentials rotate. With Stably Environments, you upload your `.env` file once and every test run pulls from the same source of truth via `--env`.
**To get started:**
1. Go to [**Environments**](https://app.stably.ai/environments) in the Stably dashboard.
2. Open an environment and click **Bulk Import**.
3. Select your `.env` file — all key-value pairs are imported automatically.
4. Mark any secrets (API keys, passwords, tokens) as **Sensitive** — they'll be encrypted, masked in the UI, and [automatically scrubbed from traces](#automatic-trace-scrubbing).
Then use `--env` anywhere — locally, in CI, or on [Stably Cloud](/run-tests/run-tests-on-cloud):
```bash theme={null}
stably --env Production test
```
**Why this is better than managing CI secrets directly:**
* **One place to update.** When a credential rotates, update it once in Stably. Every CI provider, every teammate, every scheduled run picks up the change automatically.
* **No per-provider secret configuration.** The only CI secret you need is `STABLY_API_KEY` — your app secrets (database URLs, API keys, tokens) stay in Stably, not scattered across GitHub, GitLab, and Jenkins settings pages.
* **Secrets stay protected.** Sensitive values are encrypted at rest, hidden from the API, and automatically scrubbed from Playwright traces before upload. No extra configuration needed.
Toggle **Sensitive** if the value contains a secret (API key, password, token). Sensitive values are encrypted and masked in the UI.
Once a variable is marked as sensitive, it **cannot** be changed back. The value will be hidden and only accessible by your tests at runtime.
Click **+ Add Variable** to add multiple variables at once before saving.
Click **Save** to store all new variables.
### Editing Variables
Click the **pencil icon** on any variable row to open inline editing. You can change the name, value, or toggle the sensitive flag (for non-sensitive variables only).
### Deleting Variables
Click the **trash icon** on any variable row. A confirmation dialog will appear before the variable is permanently removed.
***
## Sensitive Variables
Sensitive variables provide an extra layer of protection for secrets:
| Behavior | Detail |
| ----------------------------- | ----------------------------------------------------------------------------------------------------- |
| **Masked in UI** | Displayed as `••••••••` with a lock icon. |
| **Hidden from API** | The `get` endpoint returns `null` for sensitive values. |
| **Irreversible** | Once marked sensitive, a variable cannot be changed back. |
| **Editable value** | You can update the value of a sensitive variable, but you won't see the current value. |
| **Auto-scrubbed from traces** | When using `--env`, sensitive values are automatically redacted from Playwright traces before upload. |
Always mark API keys, passwords, database credentials, and tokens as **Sensitive**.
### Automatic Trace Scrubbing
When you run tests with `stably --env test`, any variable marked **Sensitive** is automatically scrubbed from Playwright traces before they are uploaded to Stably. You do not need to configure `sensitiveValues` in your `playwright.config.ts` — the CLI handles it for you.
This means the simplest way to protect secrets in traces is:
1. Add your secrets as variables on this page and mark them as **Sensitive**.
2. Run tests with `--env`:
```bash theme={null}
stably --env Staging test
```
That's it — sensitive values are redacted automatically.
If you need to scrub additional values that are not stored in a Stably Environment (e.g., locally defined secrets), you can also pass them manually via the `sensitiveValues` option in the reporter config. See [Stably Test Reporter — Sensitive Data Scrubbing](/stably/stably-test-reporter#sensitive-data-scrubbing) for details.
***
## Default Environment
You can set a **default environment** for your project. The default environment is automatically used by scheduled runs and cloud executions when no specific environment is selected.
To set a default, click the **star icon** next to an environment in the list, or use the **Set as Default** option in the environment detail drawer.
***
## Using Environments from the CLI
The `--env` flag lets you load a named environment's variables directly from Stably when running CLI commands. This removes the need to manage local `.env` files — variables are fetched securely from the Stably API at runtime.
```bash theme={null}
# Load variables from your "Staging" environment
stably --env Staging test
# Works with all CLI commands
stably --env Production create "login test"
stably --env "Local Dev"
```
The CLI fetches all variables from the named environment and injects them into `process.env` for your tests. Variables marked as **Sensitive** are automatically scrubbed from Playwright traces — see [Automatic Trace Scrubbing](#automatic-trace-scrubbing) above.
The `--env` flag requires authentication. Set `STABLY_API_KEY` and `STABLY_PROJECT_ID`, or run `stably login` first.
### Variable Precedence
When using the CLI, variables can come from multiple sources. They are resolved in the following order, from **lowest** to **highest** priority:
| Priority | Source | Description |
| ----------- | ---------------- | ------------------------------------------------ |
| 1 (lowest) | `process.env` | System environment variables and shell exports |
| 2 | `--env-file` | Local `.env` files loaded via `--env-file path` |
| 3 | `--env` | Remote environment variables fetched from Stably |
| 4 (highest) | Stably internals | `STABLY_API_KEY`, `STABLY_PROJECT_ID` |
If the same variable name exists in multiple sources, the higher-priority source wins. For example, a `BASE_URL` defined in your `--env Staging` environment will override the same variable from a local `--env-file .env` file.
You can combine `--env` and `--env-file` in the same command. Use `--env-file` for local overrides and `--env` for shared team configuration stored in Stably.
### Loading from a Local `.env` File
You can also load variables from a local file using the `--env-file` flag:
```bash theme={null}
# Load from a specific file
stably --env-file .env.staging test
# Load multiple files (later files override earlier ones)
stably --env-file .env --env-file .env.local test
```
### Downloading as `.env`
Click **Download .env** in the environment detail drawer to export all variables as a `.env` file. Non-sensitive variables include their full values, while sensitive variables appear as empty placeholders.
Sensitive variable values are **not** included in the download. You will need to fill them in manually.
### Bulk Import
Typically, managing test secrets across CI providers means adding each variable individually in GitHub Actions, GitLab CI, Jenkins — and keeping them in sync when credentials rotate. With Stably Environments, you upload your `.env` file once and every test run pulls from the same source of truth via `--env`.
**To get started:**
1. Go to [**Environments**](https://app.stably.ai/environments) in the Stably dashboard.
2. Open an environment and click **Bulk Import**.
3. Select your `.env` file — all key-value pairs are imported automatically.
4. Mark any secrets (API keys, passwords, tokens) as **Sensitive** — they'll be encrypted, masked in the UI, and [automatically scrubbed from traces](#automatic-trace-scrubbing).
Then use `--env` anywhere — locally, in CI, or on [Stably Cloud](/run-tests/run-tests-on-cloud):
```bash theme={null}
stably --env Production test
```
**Why this is better than managing CI secrets directly:**
* **One place to update.** When a credential rotates, update it once in Stably. Every CI provider, every teammate, every scheduled run picks up the change automatically.
* **No per-provider secret configuration.** The only CI secret you need is `STABLY_API_KEY` — your app secrets (database URLs, API keys, tokens) stay in Stably, not scattered across GitHub, GitLab, and Jenkins settings pages.
* **Secrets stay protected.** Sensitive values are encrypted at rest, hidden from the API, and automatically scrubbed from Playwright traces before upload. No extra configuration needed.