Stably Autofix maintains your tests in production — triaging failures, fixing code, and proving every fix works with real browser replays.
Accurate triage — Compares past and current test run replays side-by-side to pinpoint exactly what changed. Digs into network requests, console logs, and DOM state to find the real root cause — especially effective at eliminating flaky tests.
Scales to real workloads — Whether you have 5 failures or 500, Autofix spins up on-demand cloud browsers to validate every fix in parallel. Built for production, not demos.
Every fix comes with proof — No vibe-test fixes. Every code change is re-run in a real browser, producing a full replay report with screenshots, traces, and DOM snapshots before anything reaches your codebase.
See the full CLI guide for more details on how to collect the fixed files.
Enable the Autofix option when you trigger tests — from the UI, on a schedule, or via API.You can also turn it on by default for scheduled runs in your stably.yaml:
That’s it. Autofix handles the rest — how fixes are delivered (automatic PR, dashboard diff, or local file changes) depends on the trigger method. See Ways to Use Autofix below.
Enable autofix: true as a project default in stably.yaml, per-schedule, or pass it when triggering a run via the API or dashboard UI. Autofix runs automatically on Stably Cloud after test failures — no manual step needed.
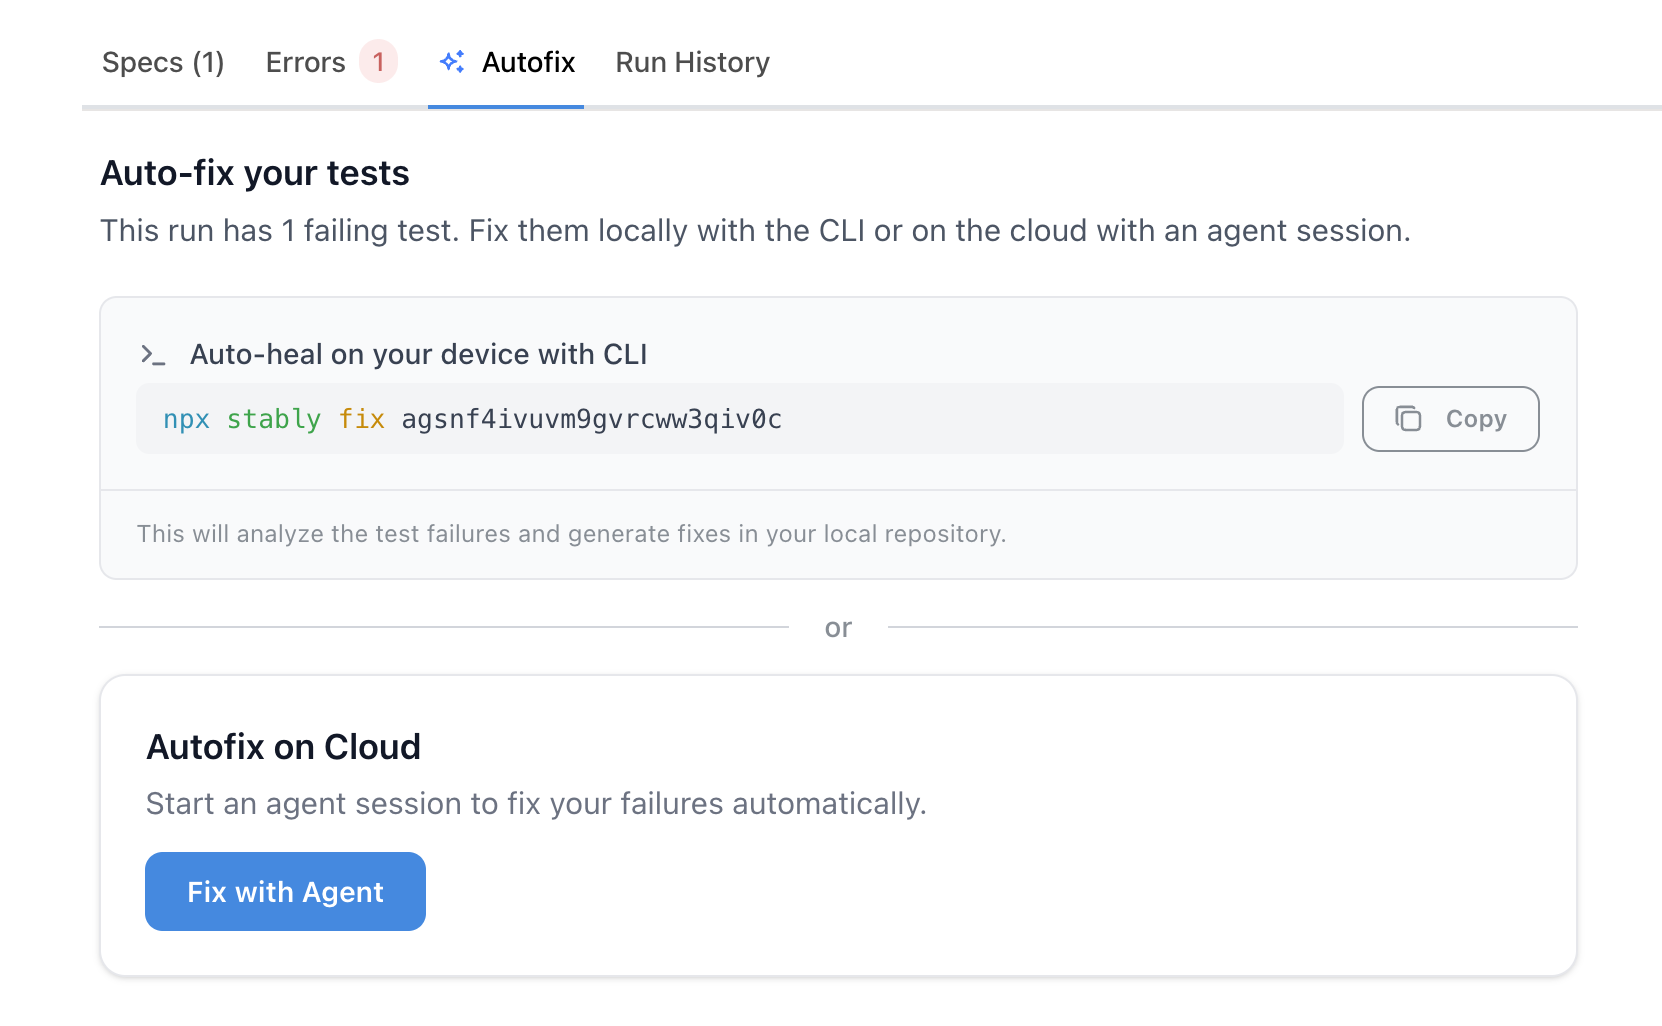
After any run completes with failures, the Autofix tab on the run details page presents two options — choose whichever fits your workflow:
Autofix on Cloud — Click “Fix with Agent” to start a cloud agent session. The agent diagnoses failures and generates fixes on Stably infrastructure; at the end you can create a PR (if your repo is connected).
Auto-heal on your device with CLI — Copy the ready-to-run npx stably fix <runId> command and run it locally. Fixes are applied to your working tree. Review with git diff, commit when ready.
This works on any failed run — scheduled, API-triggered, UI-triggered, or CLI-triggered — regardless of whether autofix was enabled at trigger time.
The Autofix tab presents both cloud and CLI options for any failed run
Add a stably fix step after stably test in your pipeline. Results are always uploaded to the dashboard, where you can review diffs and create a PR (repo connected). Optionally, add git steps to commit/push directly from CI. See the CI Integration section for examples.
Every fix is validated by re-running the test in a real browser. You get a full replay report with screenshots, traces, and DOM snapshots — so you can see proof that the fix actually works before merging.
Tests needs update
Your app changed but the tests weren’t updated. Autofix updates selectors, rewrites flows, and fixes timing issues to match your current application.For example, a checkout flow added a new “Shipping Method” step between address and payment:Before:
await page.getByRole('button', { name: 'Continue to Payment' }).click();await page.getByLabel('Card number').fill('4242424242424242');
After Autofix:
await page.getByRole('button', { name: 'Continue to Shipping' }).click();await page.getByLabel('Standard Shipping').check();await page.getByRole('button', { name: 'Continue to Payment' }).click();await page.getByLabel('Card number').fill('4242424242424242');
Actual bug in your app
The test caught a real bug in your application code. Autofix can fix the application code directly and open a PR — or flag it for your team to investigate.For example, a discount code applies the percentage to the wrong total:Bug in app code (pricing.ts):
// ❌ Discount applied to subtotal instead of pre-tax totalconst discount = subtotal * discountRate;
After Autofix:
// ✅ Discount applied to pre-tax total as expectedconst discount = preTaxTotal * discountRate;
Flaky / unstable tests
Intermittent failures caused by timing, race conditions, or dynamic content. Autofix adds proper waits, stabilizes selectors, or replaces brittle locators with more resilient approaches.For example, a test clicks a button before an API response finishes loading:Before:
When a locator fails, Autofix first tries to find the correct updated locator by navigating through your application in a live browser. It inspects the current page state, identifies what changed, and updates the selector in your test to match the new UI.If you have your repo connected, Autofix can also update the data-testid in your application code alongside the test selector. You can customize this behavior through your STABLY.md file (e.g., prefer certain selector strategies, naming conventions).
Example: Updating a broken locator
A button was renamed from “Submit” to “Place Order”, causing the test to fail.Before:
If no reliable locator can be found — for example, when the element is highly dynamic or lacks stable attributes — Autofix may replace it with an AI locator (page.getLocatorsByAI()) or an agent.act() call that uses natural language instead of brittle selectors.
Example: Replacing with an AI locator
A pricing toggle has no stable selector and changes frequently across redesigns.Before:
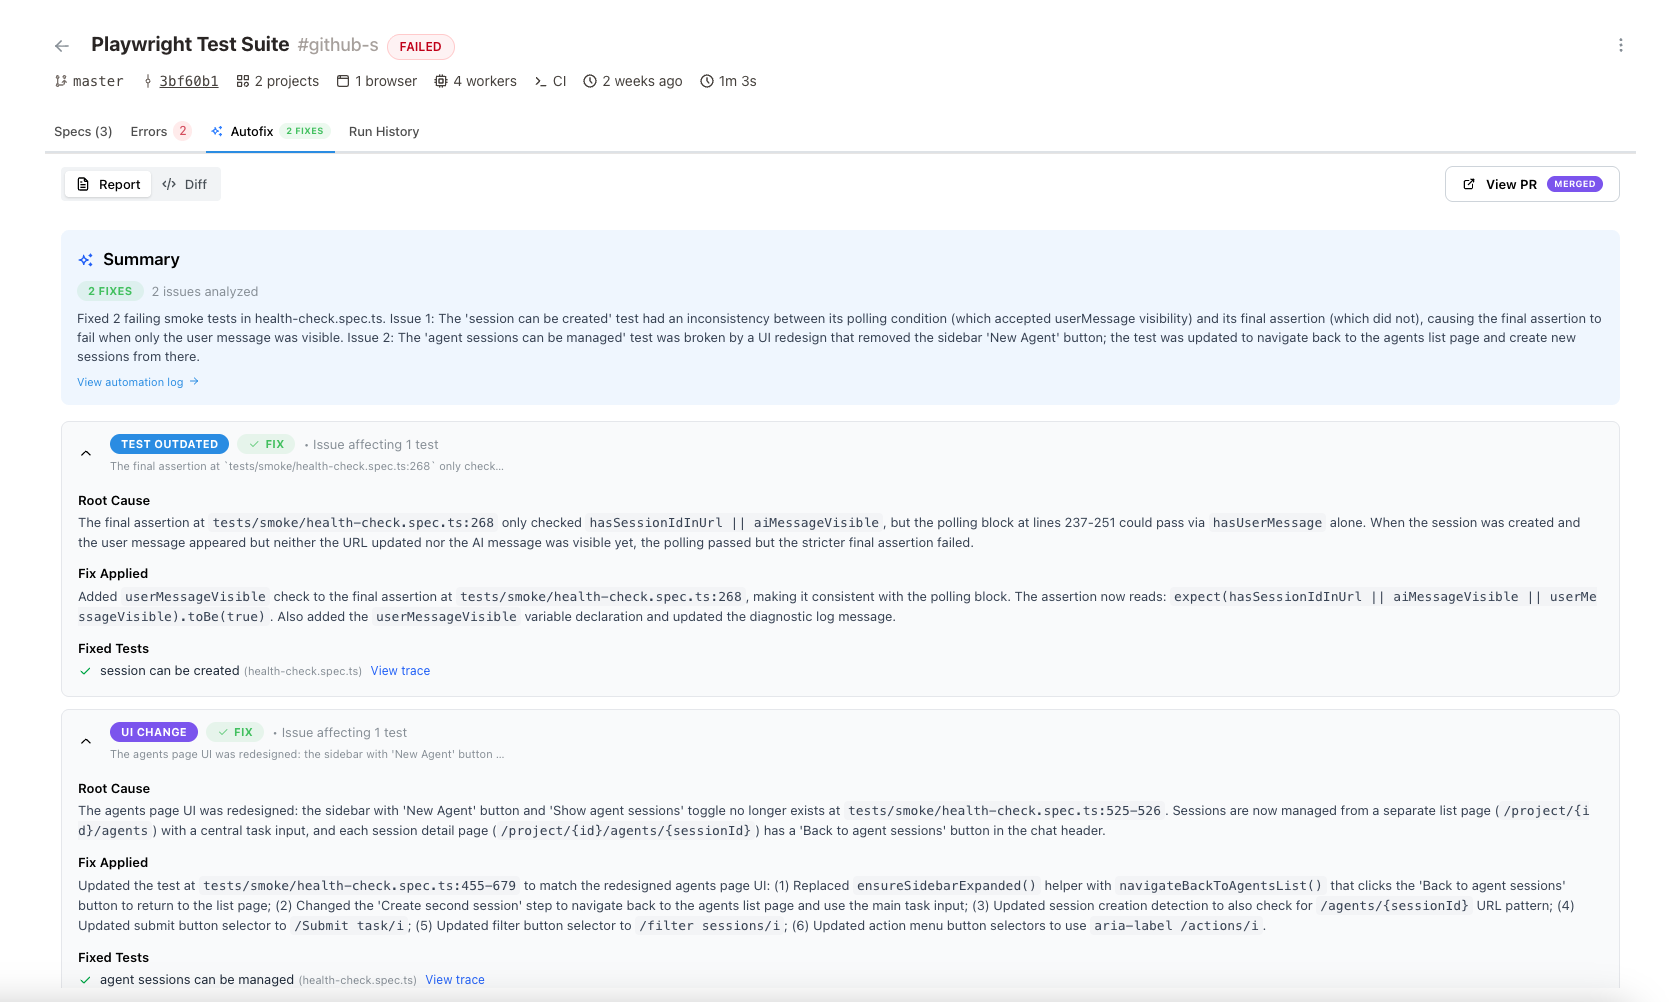
Autofix analyzes all failing tests and groups them by root cause — is it an outdated test, a real bug, or a flaky test? Repeated failures with the same root cause are automatically skipped to save cost.
2
Fix
Each issue gets a targeted fix. Autofix opens a real browser to inspect your live application, understand what changed, and apply the right code changes.
AI diagnosis report — root cause, category, and fix applied for each failing test
3
Validate in a real browser
Every fix is re-run in a real browser to confirm it actually works. You get a full replay report with screenshots, traces, and DOM snapshots — proof that the fix is correct before any code is merged.
4
Deliver fixes
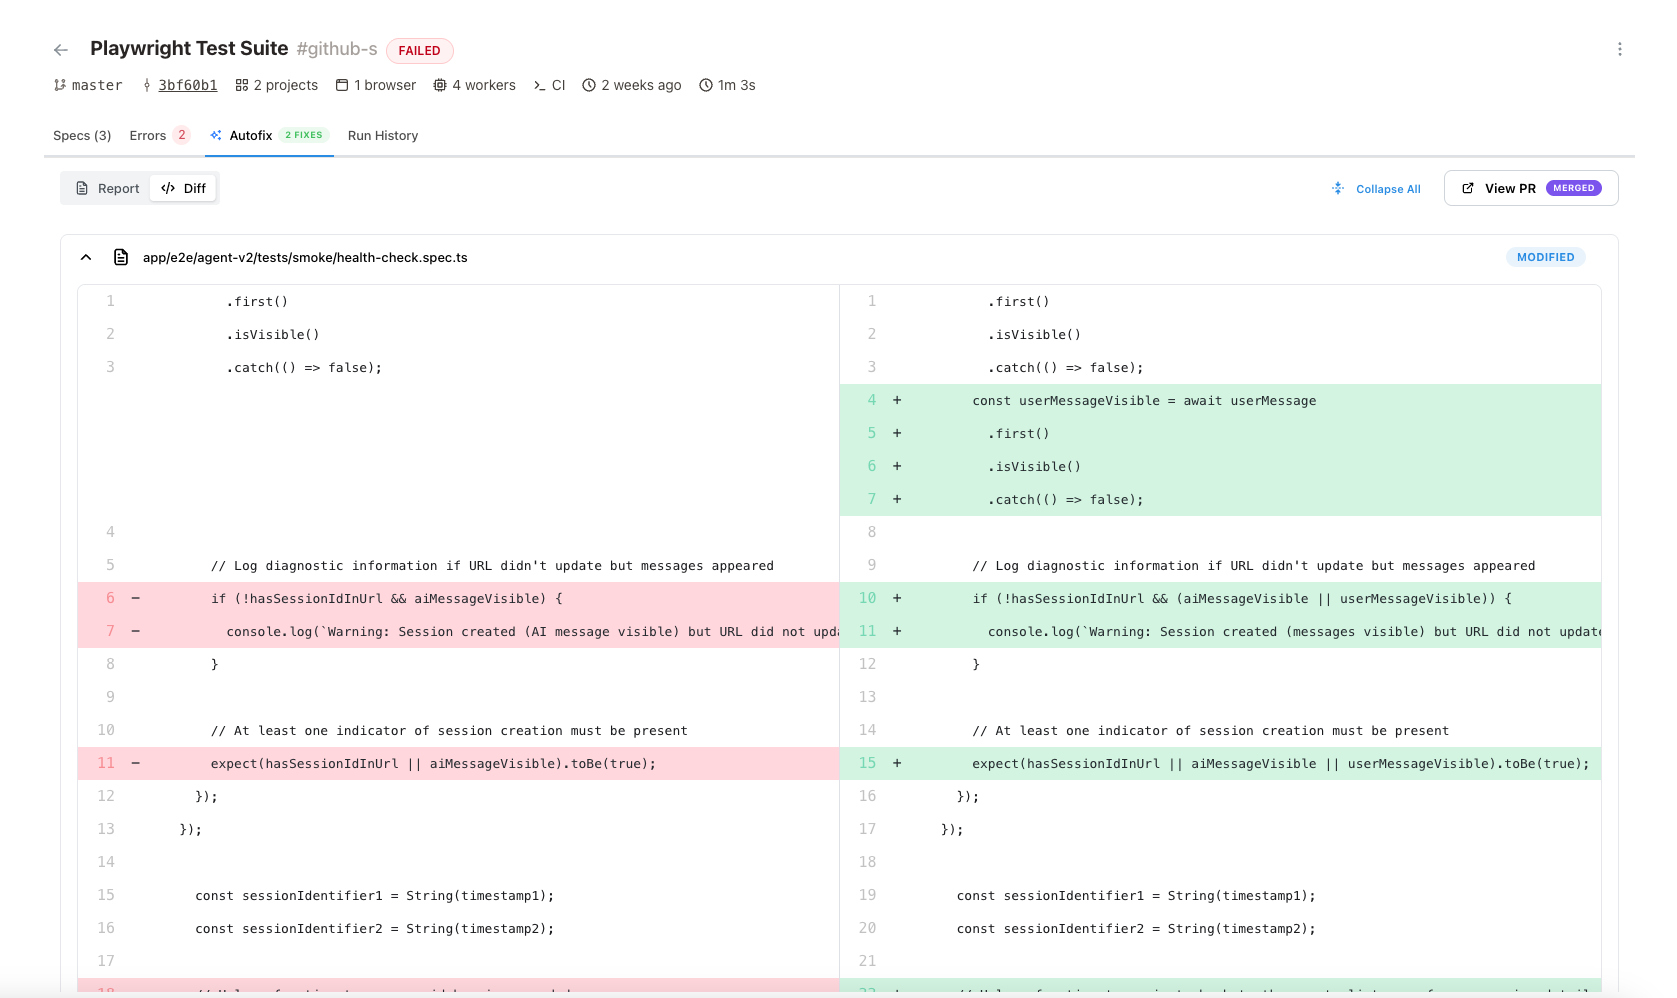
A summary report is generated with root causes and code diffs. How fixes reach your codebase depends on the trigger method:
Cloud runs with connected repo: A PR/MR is created automatically. Review and merge when ready — Stably does not push to your repo until you merge.
Cloud runs without connected repo: View diagnosis and code diffs in the dashboard. Apply changes to your codebase manually, or connect your repo to enable automatic PRs.
CLI runs: Fixes are applied to local files. Results are always uploaded to the dashboard — review diffs and create a PR from there (repo connected). In CI, you can also add git commit/push/PR steps to your workflow if you prefer.
Code diff — review exact changes before merging the PR
Cloud Runner with connected repo: Yes, automatically. Connecting your repo is not required for running tests or CLI usage — it’s only needed when you want Stably to open PRs/MRs from cloud or dashboard runs.
Cloud Runner without connected repo: No — view diffs in the dashboard, apply manually.
CLI: Fixes are applied to your local files and results are uploaded to the dashboard. If your repo is connected, you can create a PR from the dashboard. Otherwise, commit manually or add git steps in CI.
Do I need to trigger autofix manually?
Not always:
autofix: true (on schedule, API, or UI trigger) → fully automatic after failures, no separate trigger needed.
Autofix tab (post-run) → manual trigger. After any failed run, the Autofix tab offers both “Fix with Agent” (cloud) and a ready-to-copy stably fix CLI command. Pick whichever you prefer.
CLI in CI → automatic if wired into your pipeline (stably test || stably fix).
Where should I run "stably fix"?
Inside a git repository — required, since fix tracks changes via git.
Usually from the same directory where you run stably test. For non-standard layouts (monorepos, etc.), use --cwd or --config to point at the right project.
With STABLY_API_KEY and STABLY_PROJECT_ID env vars set (or use stably login).
Can I run stably fix in each CI matrix/shard job?
No. Run fix once after all shards complete, on a single machine.stably fix groups failures by root cause across all tests — running per-shard misses cross-test patterns and may cause conflicts.See the CI Integration section in the CLI guide for the correct matrix/sharding pattern.
Can the CLI access tests created on the web portal?
Yes. Set STABLY_PROJECT_ID to your web portal project ID — the CLI has access to all its tests and run history.
What env vars does the fix step need?
Always:STABLY_API_KEY + STABLY_PROJECT_ID.
Plus: the same env vars your tests need (e.g., BASE_URL, test credentials) — fix re-runs tests to validate fixes.
Use --env <name> to load a named environment from Stably, avoiding secret duplication.
Can I run "stably fix" on any failed run?
Yes. Grab the run ID from the dashboard or terminal output and run stably fix <runId> from your repo directory. Works for local runs, CI runs, and cloud runs.